
How to create a macOS installer for a Java application (.jar)
(Updated for macOS 12 Monterey)
This information is for an older version of macOS.
For more current information, visit: Mac Java!
It's easy to turn your Java Swing program (.jar) into a proper macOS application with a native installer. The instructions below step you through the process from scratch with a sample program called "Show Time", which simply displays the current time. Once you have successfully completed the tutorial with the sample Java program, modify the steps to work for your Java program.
ShowTime-1.0.pkg
This step-by-step tutorial is appropriate for beginner level developers.
(For the truly impatient, you can even run through the whole
tutorial in 30 seconds
)
1) Launch Unix terminal
Using Finder, go into "Applications" and then open the "Utilities" folder.
Now open Terminal and you'll be at the Unix prompt.
2) Install Homebrew and Java (openjdk)
Homebrew is a widely used open-source software package management system for Apple macOS that makes is easy to install Java (openjdk).
Enter the following commands to install Homebrew and Java (openjdk):
         url=https://raw.githubusercontent.com/Homebrew/install/HEAD/install.sh
         /bin/bash -c "$(curl -fsSL $url)"
         brew install openjdk
         java --version
Verify you are running openjdk 17.0.0 or later.
If your Mac has a prior version of Java already installed, consulte the openjdk formula documentation for instructions on creating a symlink to point macOS to the new openjdk instalation.
3) Make project folder
Enter these two commands:
         mkdir showtime
         cd showtime
The first command creates a folder called "showtime", and the second command moves you into the new folder.
4) Write some Java code
Get the sample Java code and take a look at the Swing commands that create a simple window for displaying the current time:
         curl --remote-name https://centerkey.com/mac/java/ShowTime.java
         cat ShowTime.java
You'll see the code:
            import java.util.Date;
            import javax.swing.*;

            public class ShowTime {

               public static void main(String[] args) {
                  JFrame frame = new JFrame();
                  frame.setDefaultCloseOperation(JFrame.EXIT_ON_CLOSE);
                  frame.setTitle("It's Showtime!");
                  frame.getContentPane().add(new JLabel(new Date().toString()));
                  frame.pack();
                  frame.setVisible(true);
                  }

            }
5) Compile Java program
Back at the Unix prompt, compile the Java program into a class file:
         javac --version
         javac ShowTime.java
         ls -o
It is possible to run the class file directly, but that results in a poor user experience. Instead we will create a more convenient executable JAR file.
6) Make executable JAR
Before we make an executable JAR file, we need a manifest file to indicate which class contains the "main" function. Create the file:
         echo "Main-Class: ShowTime" > MainClass.txt
         cat MainClass.txt
The resulting manifest file contains a single line:
Main-Class: ShowTime
Now use the following jar command to create
the "ShowTime.jar" file:
         jar --version
         jar cmfv MainClass.txt ShowTime.jar *.class
         ls -o
Test your executable JAR with the following command:
java -jar ShowTime.jar
The "It's Showtime!" window with the current time should display in the upper left corner of your screen.
Click the red button (marble) to exit the program.
Note:While the manual commands above for steps #5 and #6 work fine, you could automate them using Ant with a build.xml file.
7) Create installer background and application icon
The default icon for an executable JAR is a coffee cup. To add a custom
icon, we need to create an .icns file.
Use the following commands to download a sample PNG image, resize the
image to appropriate dimensions for an icon, and convert it into the .icns
format:
         curl --remote-name https://centerkey.com/mac/java/ShowTime.png
         sips --version
         sips --resampleHeightWidth 120 120 --padToHeightWidth 175 175 \
            ShowTime.png --out ShowTime-background.png
         cp -v ShowTime-background.png ShowTime-background-darkAqua.png
         mkdir ShowTime.iconset
         sips --resampleHeightWidth 128 128 \
            ShowTime.png --out ShowTime.iconset/icon_128x128.png
         iconutil --convert icns ShowTime.iconset
         ls -o
8) Create package resource folder
Use the following commands to copy the graphic files into a folder for package resources:
         mkdir -p package/macos
         cp -v *.png *.icns package/macos
9) Build macOS application and installer
Run the jpackage tool to build the ShowTime.app appplication and wrap
it in into an installer:
         jpackage --version
         jpackage --name ShowTime --input . --main-jar ShowTime.jar \
            --resource-dir package/macos --type pkg
         ls -o *.pkg
Note 1:
The executable JAR file ShowTime.jar checks in at a mere 0.001 MB,
but the installer file ShowTime-1.0.pkg almost hits a whopping
50 MB.
The reason is that the installer bundles the JRE (an Apple requirement for publishing Java
programs to the Mac App Store).
When you are ready to distribute to the public, you'll want to obtain a Developer ID certificate and then sign your installer with it.
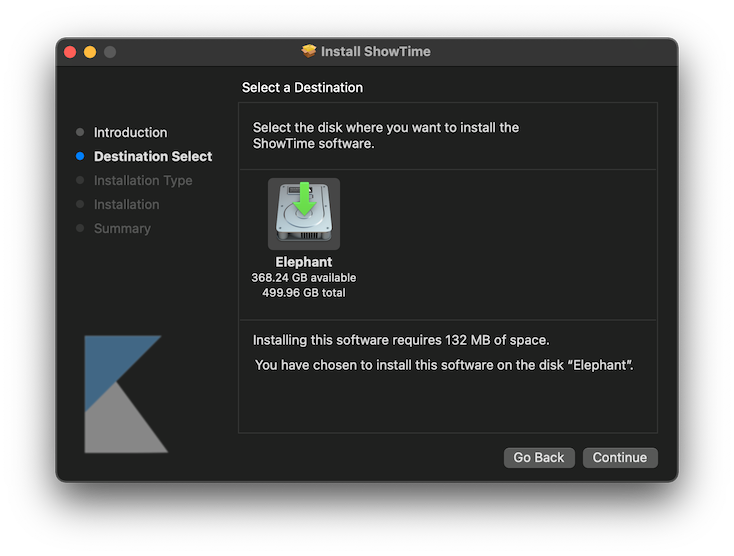
10) Try it out
Run the installer:
open ShowTime-1.0.pkg
After completing the installation, go into the "Applications" folder and open the "ShowTime" application.
Wrap-Up
If you run into any problems, compare your terminal commands and output to:
Output logFor an example of how you might distribute your installer, take a look at:
Snap BackupThat's it.